Happy almost Valentine’s Day! We got a head start on a couple of super easy to make desserts that will definitely delight your little Valentines like they did mine. I love Valentine’s Day for its simplicity and because it doesn’t take a ton of effort to make someone feel a little more special on this day. I put together a small basket of goodies for my kids and got my husband something I’m sure he’ll appreciate. I can’t wait to give it to them!
And even though today’s Valentine’s desserts aren’t “from scratch”, the thing I try to keep in mind when I attempt these endeavors is that they don’t have to be “perfect” or “Pinterest Worthy” to be enjoyed. This can be especially hard for a blogger (or mom) to remember as we’re often our harshest critics and want everything to be really pretty with gorgeous photos. But, if I waited for one of my baked goods (or anything else for that matter) to be ‘perfect’ before showing it to you, I’d never have anything to show! And sometimes, (for me at least) iPhone photos will have to do! That’s all I managed to snap of the cake pops!
So, when you’re making something like this, just think of the person the gift is intended for and put your heart into it and they will love it! You would’ve thought Martha Stewart herself made these the way my 6-year old reacted!
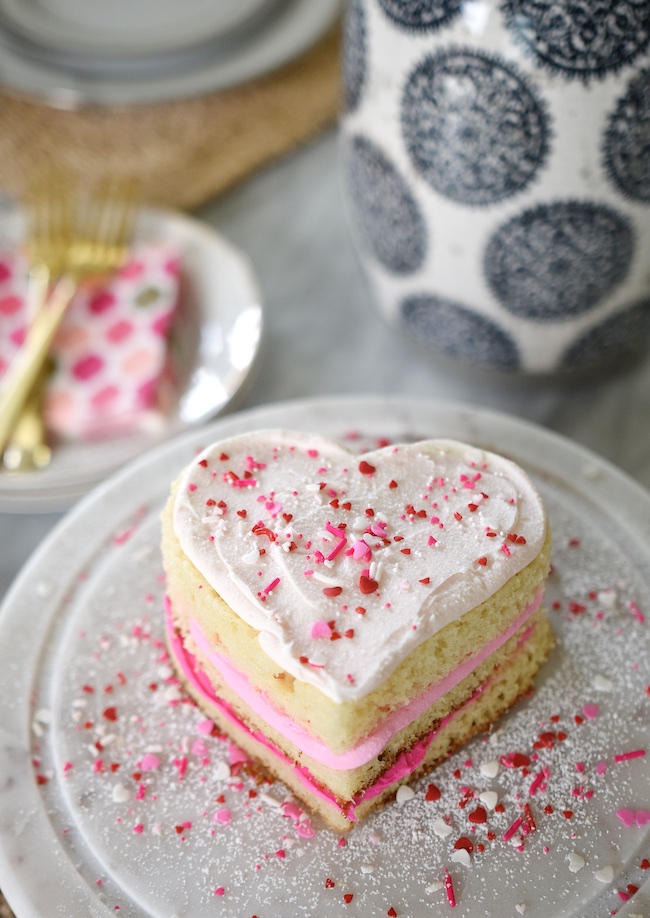
This Ombre Valentine’s Day cake is so easy to make because I just used a boxed cake mix and premade icing with food coloring and a heart shaped cookie cutter. That’s it! The sweet expression on James’ face when he saw this early Valentine’s Day surprise was priceless! That kind of enjoyment makes cutting a cake into a heart shape worth the extra few minutes it took to do that!
1. I baked one white cake according to the package instructions in a 9×13 inch glass pan because I wanted it on the thinner side so I could cut out 3 heart shapes with my cookie cutter. I leveled the cake with a serrated knife so it wouldn’t be higher in the middle.
2. Using premade white icing (that kind that comes in a round plastic jar), I added a couple drops of hot pink food coloring to make the bright pink icing.
3. To keep the cake from crumbling into the icing, I piped the icing onto the cake by putting the icing into a plastic baggie and snipping off the corner. Then I smoothed with a cheese knife. Fancy, I know, but whatever works, right?!
4. To make the lighter colored icing, I added only 1 drop of hot pink food coloring.
5. To make the lightest pale pink colored icing, I didn’t add any more food coloring, just stirred the white icing with the same spatula spoon I had used to make the second color.
6. After all three layers were assembled, I lightly dusted with powdered sugar and put the heart toothpicks on (from World Market). Then I remembered we had sprinkles, so I added those too!
So, since we had cake left over because I didn’t use it all in the heart-shaped cake, we decided to try to make CAKE POPS. I quickly googled and realized all you have to do is:
1. Crumble up your cake into fine pieces.
2. Add about 2 big spoonfuls of icing to the crumbed cake and mix together with your hands. You want to add just enough so the cake will stay together when rolled into a ball, but not so much that they are gooey.
3. Roll into balls the size of, you know, a cake pop. Basically, a little smaller than a golf ball.
4. Dip the end of your stick into the icing, then insert halfway into the middle of the cake pop.
5. Put them into the freezer for 20 minutes.
6. Scoop your icing into a deep bowl and melt the icing in the microwave for about 20 seconds on medium or until it’s nice and runny and pourable.
8. Dip the ball into the melted icing and quickly add sprinkles before the icing hardens.
9. Put the stick into a piece of styrofoam (if you have it) to dry, balls up! 😉
*Note: don’t make the balls too big or heavy or they will slide down the stick! That happened on a few of ours. #cakeballcasualties #hestillatethem
It’s the little things, right?! And I so enjoyed making these with James. I swear I could watch my kids use their hands to do things all day long. I think that’s why I loooooove watching Jordan’s little chubby baby hands eat peas and carrots! It’s the cutest thing ever! And speaking of cutest things, how’s this little sweetheart in a homemade hot air balloon?!
If I had to do it over (or in case you want to), I’d tie the balloons closer to the basket so I could get it in the shot better and it would look more intentionally like a hot air balloon! I can’t wait to share her first birthday party with you! It’s coming up on Saturday! I’ve been so busy getting her party ready that it hasn’t really hit me that she’s gonna be 1! When that sinks in, you better get the tissues ready!!! ?
Have a great day, friends! ?
__________________


Oh my goodness she is so stinking cute! I can't believe how big she's getting!
And running around everywhere!!
I'm dying over the cuteness of those pics! How has it been a year already?!?! And now I want cake for breakfast.
She's too much! 🙂
She is so cute with the most perfect skin! Just cut out the bottom of the basket and you have a Halloween costume!
Isn't that the truth, babies with their perfect skin!! So funny about the Halloween costume! I saw a similar bubble bath one with balloons that was so cute!
Thanks for keeping it real with the food photography– and the cake STILL looked magazine worthy even with iPhone pics! Jordan is just precious, and the homemade hot air balloon is so creative!
Thanks friend!!