
Mudroom in Progress {No Sew Bench Seat}
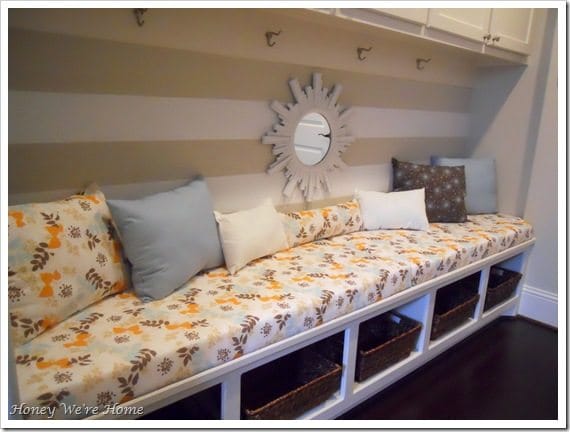

I could have agonized over the fabric for days! I actually did go to Hobby Lobby three times, Joann’s three times, and briefly scoured the Internet. Can you believe I’ve never bought fabric before?? It was a whole new wonderful world for me:) I bought about ten samples but ended up deciding on this, (which, by the way, my husband said was too “floral”). It’s from Joann’s and was on sale for $5.00 a yard.

To make the bench seat, I used these tools/supplies:
Lumber (2 @ 55 x22 inches)
Saw (only because we had to make an extra cut in the wood due to a weird corner in our bench)
Poly foam (3 inch)
Batting
Wood glue
Scissors
Serrated knife
Staple gun
Iron

Step 1: Measure the bench to determine how much wood you’ll need for the seat. My bench is really long (111 x 22 inches)! So I decided to make two bench seats.

Step 3: Cut the poly foam with a serrated knife to fit on top of your wood. My project required 2 full (22×22 sheets and a half) per board.

Step 4: Use wood glue to glue the poly foam to the wood.
Step 5: Once the glue is dry and the poly is secured to the wood (I didn’t wait that long), cover the foam with batting and trim to fit.

Step 6: Use a staple gun to staple the batting to the underneath side of the wood. Be careful to smooth the batting before stapling so that the fabric can lay smooth and flat without wrinkles when it’s time to cover. Trim the excess batting.

Step 7: Iron the fabric to remove any wrinkles or creases.

Step 8: Lay the wood, batting side down on top of your upside-down fabric.

Step 9: Pull the fabric taut and staple to the wood. After stapling the first side, I stood the wood on it’s side so that I could smooth the fabric very well before stapling the second side.


Step 11: Trim the excess fabric.

And there you have it!
Our mudroom sure has changed! See the updated bench seat/pillows and painted doors. See how we’ve organized our mudroom here.


Great fabric choice! I didn't see the others but I would have picked this one if it was put in front of me. And I don't think it's too floral at all 😉 Great job!
Check out my beachy cube shelf makeover!
-Desiree
Wow—the seat looks AMAZING! Great job!!! And thanks for the shout-out, girl. Can you believe that I am considering recovering the chairs again in a more fall-friendly fabric? Haha… I think my husband thinks I'm crazy. 🙂 Of course I would just cover over the stripes so that once the holidays were over, I could just go back to my beachy blues and greens. 🙂
It looks fabulous! I don't think it looks too floral either. (tell hubby you promise not to use it in HIS garage 😉
okay, you are crazy talented! I would have paid someone to do that for me! 😉
It looks great! And I love your fabric choice!
http://lisafergus.blogspot.com/
I love the fabric! So Cute 🙂 Looks amazing! Nice job
Looks perfect!
I love covering bench seats because you can also switch it out whenever you want…so easy.
Looks fantastic! Great job!
I just love everything you do in your house! And your mudroom is such a dream! You make this project look so easy, I might just have to try it out!
Wow! You are good! And I adore your fabric choice here!
What a fabulous way to make a bench cushion! Thanks for the how-to!
Visiting from Anything Related ~ Wow, absolutely beautiful job!! And great tutorial, I have a bench that's in dire need of something like this. Will be bookmarking for later! 🙂
looks great! thanks for linking to Take-A-Look Tuesday at Sugar Bee Craft Edition
Great job! It looks amazing!
I LOVE this tutorial! Thank you so much for sharing! I am wanting to do this exact thing to a window bench in my home. But I never knew where to start! P.S. I'm your newest follower! :0)
Jen
http://framefanatic.blogspot.com
Awesome! Its like covering a chair seat only bigger. Great project, I love your fabric!
AMAZING. Thanks for sharing. Your home is just beautiful! Happy to be following along now!
i'm going to be turning my old army trunk into a padded bench in my new front hall when i move next month. over the summer i saw a post somewhere about a no-sew way to recover patio furniture –> the blogger used safety pins on the underside of the cushion to hold the fabric taut. afraid of putting holes in the fabric that might get bigger with time, plus using the idea of those eco-sandwich wrap patterns that you make of reusable/washable material, fold around your sandwich and hold in place with velcro, that's what i'm going to do to cover the foam top on the bench. this way, it's easy to remove, wash, and put back in place. (granted, i don't have kids with sticky hands, just a black cat who likes to shed regardless of how much i brush him!) just make sure to wash the fabric before you make your 'foam wrap' or it won't wrap properly after it's nice & clean again!
You are my inspiration this weekend… well this week, it will probably be a weeklong process haha! My son has a high bed with drawers underneath. We never use the drawers now so I took them off and will attempt to make a bench out of it! Wish me luck! jaggedlittlelife.blogspot.com
What a cute room! I love the fabric!
That fabric is soooooooooooo cute!!!!!!!! Love it! Thanks for linking up to gettin' crafty on hump day 🙂
Wow! I love it!! What a cute room, I love the wall too!!
I love that fabric! And I'm drooling over your mud room too. Someday… someday I will be in a home instead of a rental apartment… someday. 🙂 Thanks for giving me some inspiration to tide me over until then!
Stopping by from the Weekend Wrap Up. Have a great weekend!
Lorene
just Lu
Wow…how have I not found this lovely blog? Love this little nook you have created…perfection!!!
Cheers~
e
Great tutorial! Thanks for stopping by and joining us for Anything Related!
{Rebekah}
What a wonderful job! Love the fabric, pillows, stripes… You must be so happy with this spot.
I love your bench seat, I would love a mud room to put one in, but something like that would be great at my front door!
This looks so great! Please come to my house and make two window seat covers and one bench cover, OK? Thanks for the great step-by-step, as I'll be using it shortly! I love the fabric choices too – great job!
Ahhh…I LOVE this project! And I featured it in our Frugalicious Friday Favorites today! Thanks for linkin' up and feel free to grab out button.
Jane
Finding Fabulous
Super cute! I love how simple it is and how fabulous it turned out!
I'm attending a free class at my local Home Fabric store this weekend on making a cushioned bench seat. Depending on how they do there's I might use your tutorial instead! Your bench turned out fabulous!
Great tutorial! I cannot sew a stitch, but think I could surely do this!
Nice! I think I can try out your project on one of my own this week. Perfect timing. Thanks!
Do you need to secure the cushion down to the bench at all or does it stay in place on it's own?
Does you bench have a "lip" on it so the cushion doesn't slide around? I've saved this post for awhile and plan on doing it this weekend, but was wondering if it stays in place or not. email is lizcolville (at) hotmail (dot) com
Thanks for your tutorial! We just got done with our bench cushion and couldn't be happier! We used memory foam from a bed topper instead of the regular foam from hobby lobby but it seems to work pretty well, it stays squished down for a second after you get up but overall it looks great!
Thanks for your idea and steps!
this is genius! You just solved my bench problem. Thank you!
Love this post. Have used it to make my own bench cover in my new mudroom and linked back to this post to show the how-to. Wanted to pass along the link: http://feedingfourfood.blogspot.com/2012/02/empty-hallway-to-organized-beautiful.html
Great tutorial. Where did you get the bench? I need one too.
Love how it turned out. What is the benefit of using the batting before putting on the fabric? I'm getting ready to create my own bench seat and wanted to ask before I bought everything. Thank you!
This is great! Thank you! I have a bench that is 45 x 17 3/4. I am thinking it would only take 1 yard of fabric (54 in. wide). Am I mistaken?
Excellent idea! I'm going to do this myself.
Gonna try this in our laundry room seating area! Would love to know if the cushion stood the test of time?
Does the cushion move when you sit on it? Did you secure it with anything?
Love this! I have mud room envy 🙂